Stampin' Up.
Thursday, 11 July 2013
New Wood-Mount Cases
The new Stampin' Up! Catalogue that was released on the 1st of July for 2013 -2014, has lots of wonderful ideas and products. I just love the new Wood -Mount Cases. Now all your wood mount stamps will sit just like VHS cases on the shelf! No more worrying if you have the labels on the right way so they sit properly. They come in two sizes half and full size! They come in packs of 4, half size $8.95 Item no 127552 and full size $11.95 Item no 127551. Your wood mount storage problems have just been solved! Thank you
Stampin' Up.
Stampin' Up.
Sunday, 28 April 2013
Working with Vellum

Sunday, 21 April 2013
Love that Glimmer Paper!
 In Friday's class the ladies were shown how to colour the Glimmer Paper to a colour of their choice, so you can add a whole heap of 'bling' for not too much effort. A base of Baja Breeze was used and this was topped with a piece of Whisper White which was run through the Big Shot Twice, once to do the lacy edging from the new Delicate Design Folders, then again by placing the edge of the new Lacy Brocade embossing folder to the top edge of the lacy embossed area and run it through . A piece of Bashful Blue Ribbon was placed around the centre of the card and secured by adhesive to the back and then the whole piece to the card base. The larger frame was cut using the Glimmer paper and the smaller frame was stamped and coloured with Stamp n Write Markers first, then run through the Big Shot as well. To colour the Glimmer paper, the ladies simply sponged the area with Baja Breeze then attached the stamped image to it using Snail. Dimensionals were used to lift the Glimmer Paper Framelit from the card base. Two small flowers were punched using the the four leaf flower from the Itty Bitty Shapes Punch Pack. These were attached using Glue Dots and then a small pearl was placed in the centre of each flower. The insert of the card was Whisper White which had the Lacy Edge to the bottom. A lovely card, and really not too much too it but it certainly has a lot of WOW about it. Till next time.......
Friday, 19 April 2013
Christmas...........so soon?

and applied it directly to the base. Next it was 2 Oval Framelits in Very Vanilla, which I quickly stamped the larger one with the pine needles from Watercolour Winter in Old Artichoke, then the holly branch from the same set which was stamped using Stazon Ink and coloured with Stamp n Write Markers. The Greeting is from Snow Swirled and that was stamped off then onto a piece of Very Vanilla and using the Square Punch to finish the greeting panel. The ladies used their imagination and one was done as mine, another used rounded ends and another was done using one of the Apothecary Labels. A Very Vanilla Insert was placed inside and the ladies either off stamped the holly branch or the pine needles in one corner and the verse from Snow Swirled was used too
Sunday, 14 April 2013
Sunny Challenges 77/13


Hi Stampers, This week at Sunny Challenges and Creations, Vicky set the challenge and it was to use the sketch, and added the theme was to be either Mothers Day or a Female Card. I thought this week that rather than use stamps as the main component, I would take myself well and truly out of my comfort zone and I would use use my Big Shot and punches to create my card. I used Whisper White as the base and topped that with Whisper White again which I embossed using the Lattice Square Embossing Folder. The scallop circle was cut using the Scallop Circles #2 Die in Bashful Blue. A Whisper White mat was cut using the 2 1/2" Circle Punch. For the Bashful Blue flowers I used the Blossom Party Originals Die and for the centres I used the same die and used a scrap of Silver Glimmer Paper that I had on my desk and sponged them with Daffodil Delight. The leaves I used my old favourite Old Olive and the Bird Builder Punch, trimmed them off and placed them behind the flowers. The sentiment I used my Black Marker Pen and only inked the word Mother onto Whisper White. This was punched out using the Large Oval Punch and I matted this onto a Scallop Oval which I had punched out in the Bashful Blue. I had placed a small punched flower in Baja Breeze to which I added a large pearl from the Basic Pearls. The Punch I used for this flower is a retired Stampin' Up Trio Flower Punch. Dont forget to check out the challenge blog and visit our other designers, and check out their beautiful creations for this challenge. You now have 2 weeks to enter our challenges so you have plenty of time to get your creations to us, and who knows you may well be our next Ray of Sunshine! Till next time....
Sunday, 31 March 2013
Challenge 76 Sunny Challenges and Creations

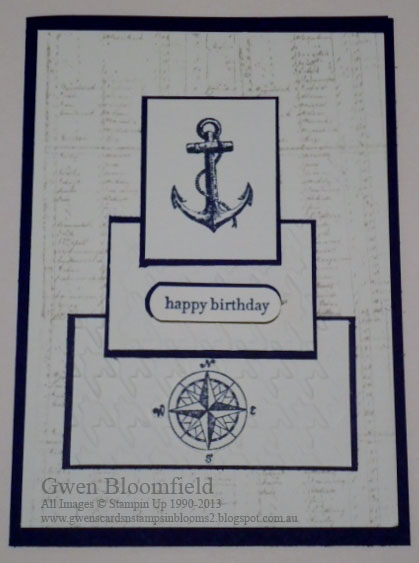 Hi there once again! This week over at Sunny Challenges and Creations, our very talented Kris supplied the sketch and the other part of the challenge was to use a background stamp or stamp a background. I used Night of Navy Card Stock, Very Vanilla Card Stock and Night of Navy and Sahara Sand ink. I decided I wanted to use the Open Sea set, and it came together ever so nicely I thought.
Firstly I used the ledger stamp from that set and using Sahara Sand I off stamped it onto some scrap then stamped it four times to cover the Very Vanilla cardstock I then took 3 smaller pieces of Very Vanilla and on one I stamped my main image and on the other two I ran them both through the Big Shot using the Hounds tooth Embossing Folder then matted them onto Night of Navy cardstock. I also stamped a compass and cut it out and attached it to the bottom panel. The middle Panel I used Teeny Tiny Sentiments and chose the happy birthday greeting. I punched the greeting out using the Word Window Punch twice and slightly offset the Very Vanilla on the Night of Navy.The inside of the card I off stamped the Sahara Sand and placed the earth globe in it. We would love you to check the other creations and join us in this fun challenge! Till next time.....
Sunday, 24 March 2013
Basic Masking

Friday, 22 March 2013
Window Sheet Card
.jpg)
Monday, 18 March 2013
Direct Ink to Paper Technique
.jpg)

.jpg) Direct to Paper Technique or DPT is a very simple but effective way to create a back ground in a matter of seconds! The thing to remember when you first attempt this technique is be 'lightly as you go' When you have done it a couple of times and feel a little more adventurous you may well want to see the effects that you can have by being a bit more heavy handed with the inks you are using. I followed a tutorial by Michelle Zhindorf changed the colours, the embossing folder used and added some brads to the bottom corner of the card. I am going to show the ladies that come to the class this week how to do this wonderfully simple technique. I used Marina Mist for my base, and the houndstooth embossing folder on the old olive card stock. The DITPT card front was mounted on Always Artichoke and the little corners were made by punching out a 1 3/8" square and cutting it diagonally in half and placing behind the Always Artichoke on the top and bottom corners on the non opening side of the card. On the inside of the card I used the same image as the front using Sahara Sand but off stamped it three times before stamping of the Whisper White insert. This is so there is just a very faint image and therefore able to write over it if required. This is such a fun technique and I hope you will try it. Till next time
Direct to Paper Technique or DPT is a very simple but effective way to create a back ground in a matter of seconds! The thing to remember when you first attempt this technique is be 'lightly as you go' When you have done it a couple of times and feel a little more adventurous you may well want to see the effects that you can have by being a bit more heavy handed with the inks you are using. I followed a tutorial by Michelle Zhindorf changed the colours, the embossing folder used and added some brads to the bottom corner of the card. I am going to show the ladies that come to the class this week how to do this wonderfully simple technique. I used Marina Mist for my base, and the houndstooth embossing folder on the old olive card stock. The DITPT card front was mounted on Always Artichoke and the little corners were made by punching out a 1 3/8" square and cutting it diagonally in half and placing behind the Always Artichoke on the top and bottom corners on the non opening side of the card. On the inside of the card I used the same image as the front using Sahara Sand but off stamped it three times before stamping of the Whisper White insert. This is so there is just a very faint image and therefore able to write over it if required. This is such a fun technique and I hope you will try it. Till next time
Sunday, 17 March 2013
Get Well or Hope you feel better challenge
.jpg)
 Hi Stampers this week I set the challenge at Sunny Challenges and Creations, the brief was very simple just create a Get Well Card scrap page of 3D item. Even though I set the challenge I still had to think about what I wanted to do. I took a piece of Marina Mist card stock, folded in half and then in half again on the front opening. I then placed the beginning of the folded front half in the big shot and using the largest of the Apothecary Accents Framelits cut out 1/2 the shape, I also cut a full framelit the same size but using Twitterpad DSP. I then embossed the card front using the Elegant Lines embossing folder twice to get embossed coverage to the whole of the card front, and then I folded the 'scrap piece' back to the centre of the card. I used white taffeta ribbon to the front and adhered it under the back flap of the front. I used the Word Play stamp set for my sentiment and punched it out with the Decorative Label Punch and sponged around the outer edge with Marina Mist. For the inside of the card I used the Tulips embossing folder on Whisper white card stock and added the flower image from Serene Silhouettes, which I had stamped off three times before adding it to the Whisper White. Kris, Vicky and I hope you will play along with us the next two weeks on Sunny Challenges and Creations, and check out what our guest designers have come up with for the challenges as well. Till next time....
Sunday, 3 March 2013
Sunny Challenges 74/13


This week over at Sunny Challenges and Creations, it was Vicky's turn to present the challenge. Vicky gave us this sketch and it was to be an Easter card. First up my thoughts turned to the usual Easter Bunnies, chocolate eggs, adorable little chicks and so on. When I eventually banished these images from my mind I came up with this creation.
My card base is Whisper White, and I have matted that with a strip of Raspberry Ripple that was embossed with the Honeycomb embossing folder that I ran through the Big Shot. I matted piece of Whisper White onto another piece of Raspberry Ripple, and using the masking technique I stamped the large flower from Everything Eleanor and then stamped another flower image, cut it out and attached it to the centre flower with dimensional. I off stamped the flourish using Gumball Green. The sentiment from Well Scripted stamp set is stamped in Raspberry Ripple and punched out using the Scallop Oval Punch. To finish it off I dabbed Silver Dazzling details on the stamens of each flower. We love to see your creations too and who knows you could be our next Ray of Sunshine, till next time......
Saturday, 2 March 2013
Flower Treat Holder

.jpg) The weather here in not so sunny Queensland is keeping many of us indoors, so today I thought that I would make some flower treat holders. I first saw some that Kris had made, following a tutorial at Stamp Academy . They have the most amazing tutorials there and the projects are so easy with step by step instructions both by video and PDF. I loosely based mine on those, instead of using Hearts a Flutter and the coordinating framelets, I used Fun Flowers Bigz L die and using the large and the smaller flower, I ran the DSP through the Big Shot. Some of the DSP is current and some is not. I was using up what I had on my work bench...so much better to use it up than have to put it away! I also used some non SU Jumbo type brads in the shape of a flower and some others that I either tied a bow on or threaded ribbon through the eyelets of them. I basically followed the instructions supplied. I filled the cello bags with M & M's and Smarties. I know the grandies will love these. Till next time...
The weather here in not so sunny Queensland is keeping many of us indoors, so today I thought that I would make some flower treat holders. I first saw some that Kris had made, following a tutorial at Stamp Academy . They have the most amazing tutorials there and the projects are so easy with step by step instructions both by video and PDF. I loosely based mine on those, instead of using Hearts a Flutter and the coordinating framelets, I used Fun Flowers Bigz L die and using the large and the smaller flower, I ran the DSP through the Big Shot. Some of the DSP is current and some is not. I was using up what I had on my work bench...so much better to use it up than have to put it away! I also used some non SU Jumbo type brads in the shape of a flower and some others that I either tied a bow on or threaded ribbon through the eyelets of them. I basically followed the instructions supplied. I filled the cello bags with M & M's and Smarties. I know the grandies will love these. Till next time...
Sunday, 17 February 2013
Valentines Day
.jpg)
.jpg)
.jpg)
.jpg) This year I decided to make some small heart shaped gift boxes that Crafty Maria had on her blog and she had cased them from HERE. They were so easy to make and so quick, I thought perhaps if I made a few and a few cards then I would be covered. because I dont usually sell a great many at my market stall for Valentines Day. For whatever reason this year was very different from the last 3 years and I couldnt keep up with cards (maybe the newsagent running out had something to do with it).
This year I decided to make some small heart shaped gift boxes that Crafty Maria had on her blog and she had cased them from HERE. They were so easy to make and so quick, I thought perhaps if I made a few and a few cards then I would be covered. because I dont usually sell a great many at my market stall for Valentines Day. For whatever reason this year was very different from the last 3 years and I couldnt keep up with cards (maybe the newsagent running out had something to do with it).The heart covered card was made from Whisper White and matted with Real Red. I used some scraps of card stock and DSP some current and some retired and punched away with my retired triple heart punch, I then adhered them to the card stock and run the card stock through the Big Shot using the Square Lattice Embossing Folder. Using my heart Framelits I Cut out some hearts this time using the Bigshot and embossed them using the polka dot embossing folder, I attached the small heart with a dimensional and added a basic rhinestone to the centre. The next card was one I CASED on a blog and I can not remember who it was. So if the triple heart card looks familiar and is yours please let me know so that I can give you credit for your creation.It uses Riding Hood Red, Melon Mambo and Primrose Petals, each punched heart punched out and placed onto matching cardstock with a dimensional. These were attached to Whisper White Cardstock with a trim of Dotted Scallop Border Trim Punch. The last card is one that is just all the left over hearts that I had punched out and I made them to look what I thought was hearts overflowing from a box. I then trimmed the bottom of the box with some of the smallest hearts from the retired triple heart punch. These were all quick to do and apart from the sentiment had no stamping on them
Feeling Sentimental........

 This weeks challenge with Sunny Challenges and Creations was to use some of those lovely Sale-a-bration items that we have received for free when placing an order of $100.00. You have to admit that it is not hard to spend $100 with so many wonderful things available to us in the Holiday Mini or The 2012-2013 Catalogue. I decided to make some coasters using the three picture images from the Feeling Sentimental set, and to do this I used the Scallop Circle Die and some backing cardboard from the Silver Glitter Card stock and run it through the Big Shot. I did the same with the First Edition Specialty Paper and some cork sheet that I had on hand here. I Stamped the images using Early Espresso on the Specialty paper and adhered it to the scallop shape of the cardboard, cork backing and the Limited Edition SP using my Anywhere Glue Stick (love that stuff). I then sponged the image and the SP with Soft Suede to give it an Antique look. To finish it off I covered the top with Crystal Effects and let dry. I love the way they have turned out and think I may be making more of these as small gifts. My next project was to make a card using the telephone box. Once again I used the Limited Edition SP on the bottom section of the card and Whisper White which I had embossed using the Square Lattice Embossing Folder, on top of a Real Red Base. I added a strip of Real Red which I had punched with the Dotted Scallop Ribbon Border. The phone box image was stamped using Real Red once again on Whisper White and matted onto a piece of Basic Black card stock. Very simple and very effective. Till next time, take care.
Saturday, 16 February 2013
Sunny Challenges and Creations for this Week

 This week Kris set the challenge and it was simply to create something using the sketch that she supplied and something from Sale-a-bration. On the right is my interpretation of her sketch, and to make my card I used Sycamore Street DSP. My base is white and that is topped with a piece of Raspberry Ripple cardstock that I put throught the Big Shot using the new Honeycombe Embossing folder. The DSP I layered onto a piece of Summer Starfruit cardstock, which along with the Raspberry Ripple cardstock belong to our In Colours range for 2012 -14. The butterflies were stamped in Raspberry Ripple, Summer Starfruit and Pool Party and punched out using the new butterfly punch. I placed 3 small seed pearls along the spine of the butterflies and attached them using Mini Glue Dots. Please check out the other samples from our design team at Sunny Challenges and Creations and why not play along with us for the chance to be our Ray of Sunshine? We only have one rule to be eligible to win our Ray of Sunshine and that is to use Stampin Up products, be they current or retired. Till next time, take care.
Welcome to my blog...Take 2
Most of you will know me from my other blog Gwens Cards n Stamps in Bloom. I have had all sorts of problems trying to log into that account, so rather than rip my hair out any longer I decided I would create Gwens Cards n Stamps in Bloom 2!
Please look in on me from time to time and see what I have created. Also make sure you check out Sunny Challenges and Creations for a new and exciting challenge every two weeks for you to take part in if you wish and who knows you could be the next Ray of Sunshine!
Until next time, take care and happy stamping.
Subscribe to:
Posts (Atom)